You can add a trainee to a progress report from the RTD screen. To access this screen, you must first perform a search for the grant.
Click the  three-dot ellipsis button and select the Prepare for RPPR or Continue for RPPR link to open the Prepare Research Training Dataset (RTD) for Research Performance Progress Report (RPPR) screen.
To add a trainee from a search:
- Select the Add
- Enter parameters and select the Search Persons button. By default, the search will be conducted within your institution, but you can expand this search to look outside of your institution by removing the checkmark from the box titled Search for persons who have a Commons affiliation with my institution.
NOTE: You must enter a Commons ID, Person ID, -or- Last Name to perform a search.
- All matching records display in the Person(s) table. Click the Add Trainee as drop-down in the Add to RTD and select the appropriate option to add the person.
- Click the Add Person(s) button to add them to the RTD.
To add a trainee you are creating:
- Perform a search as described above. You cannot create a new person record unless you first perform a search.
- Select the Create a new xTRACT person record here button located under the Person(s) table. This button is only available after you have performed a search.
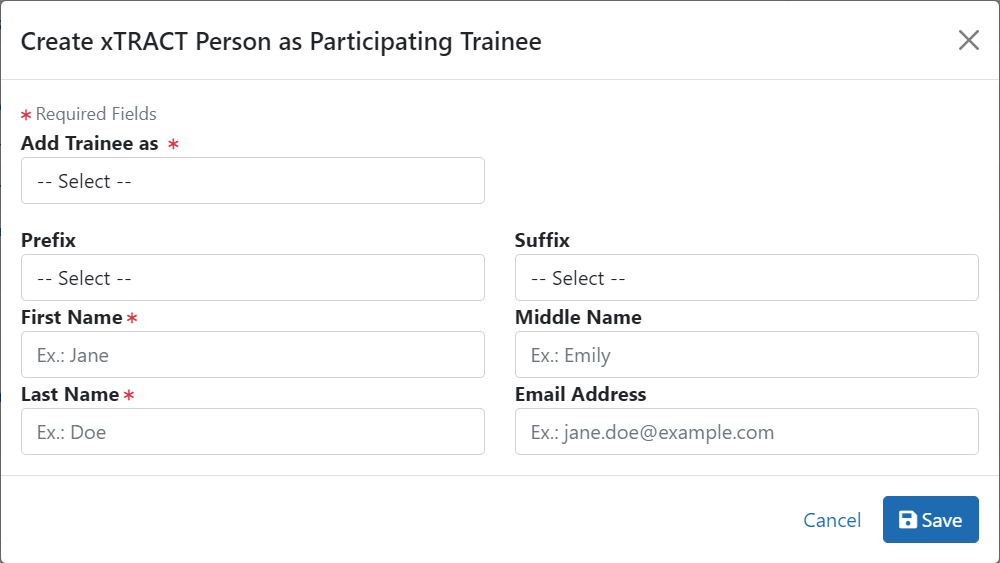
The Create xTRACT Person screen displays.
 Click to view)
 - Enter the person data in the designated fields.
- Add Trainee as (required) - Select an option from the list.
- Prefix: Select an option from the list.
- Suffix: Select an option from the list.
- First Name (required)
- Middle Name
- Last Name (required)
- Email Address
- Click the Save button to save the changes.
Use the displayed xTRACT Person Profile to provide details about the added person. For additional information, refer to the topic titled Refer to xTRACT Person Profile.
To perform a bulk upload of trainees :
- Select the Upload Participating Trainees link.
- The Upload Participating Trainees screen will open.
- A link to download a tab-separated (TSV) text template file is displayed.
- Important Notes When Uploading Participating Trainee Data:
- The tab-delimited template format includes the following required columns: Commons User ID, Student Type, In-Training Indicator, Start Date, End Date, Research Topic, Faculty Commons User ID 1, Faculty Commons User ID 2.
- The Commons User ID, Trainee Type, and In-Training Indicator are required for each uploaded participating trainee. The other columns may be left blank, as appropriate.
- If the same Commons ID is provided for multiple entries in the upload file, an error will be reported.
- The trainee Type must be one of the following (without quotations): "POST-DOC", for Post-Doc, "PRE-DOC" for Pre-Doc, and "SHORT-TERM" for Short-Term.
- The In-Training Indicator must be one of the following (without quotes): "Y" for Yes or "N" for No.
- Valid date format for Start and End Dates is MM/YYYY.
- If it is provided, the Research Topic must be 200 Characters or less.
- Up to two faculty members may be provided for each trainee, and each must be identified by a valid Commons ID.
- Each trainee provided in the upload file will be used either (a) to add that person to the RTD's participating trainee list, or (b) to update information for the person (if already listed on the RTD as a participating trainee).
- If uploading date to update an existing participating trainee, all information on the input record will be used to replace data that is currently stored, with the exception of the trainee type which cannot be altered. For faculty member, this means that any faculty who may currently appear for the indicated trainee in xTRACT will be removed, and then replaced by the faculty who are listed for that trainee in the upload file.
- The data will be validated upon upload of the file and the results will be presented on the screen.
- If the upload fails for any reason (such as incorrect data or incorrect format), none of the records will be saved in xTRACT. Data will only be saved if all rows in the upload file pass validation.
- A browse link allows you to select an existing, correctly formatted file.
- When Browse is used to select an existing file, the system will perform a validation to ensure that the file conforms to the correct format and that the data satisfies the conditions described in the guidelines.
- A pop-up message will display if the format is not valid and that file will not be uploaded. Any data validation errors must be corrected before any changes are accepted and applied.
- If there are no validation errors, the data will be applied and a success message will appear.
