Managing Conflicts
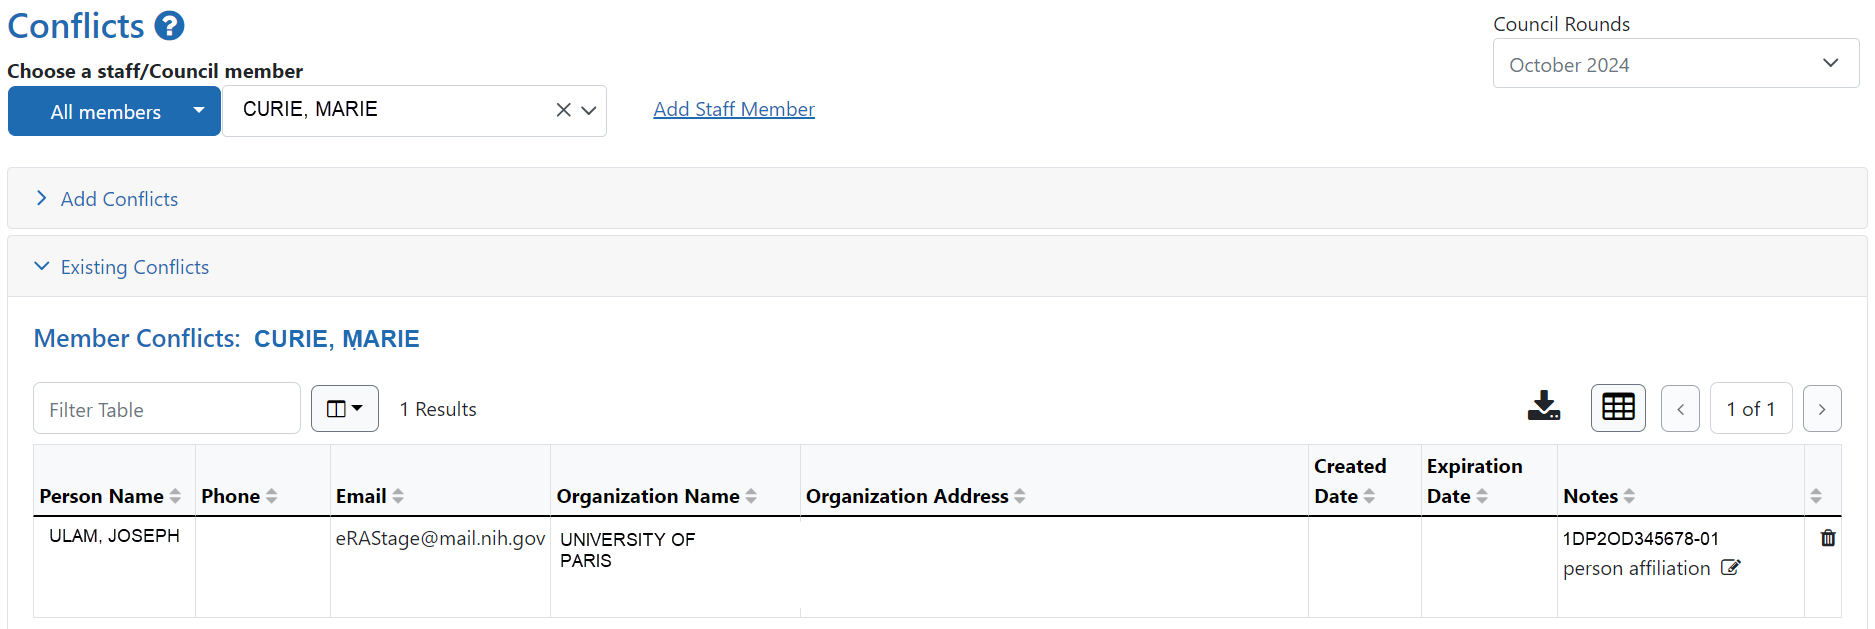
The Conflicts screen allows you to select council and staff members, view existing conflicts, and enter new conflicts.

Selecting a council round
The Council Rounds drop-down at the top of the screen limits the page to the selected council round. Although it defaults to the current council round, you may select previous and next rounds.
NOTE: If you select a previous council round, the screen content will be read-only.
Council rounds roll over on the following dates:
|
Council |
Rollover date |
|---|---|
|
January Council |
November 1st |
|
May Council |
March 1st |
|
August/October Council |
July 1st |
Selecting a staff or council member
| 1. | Use the All members drop-down to filter for All members, Council members, or Staff members. |
| 2. | Click the Choose a staff/Council member drop-down and select the member you wish to view. |
| 3. | If a council member is not included in the drop-down, refer to the Manage Council Members Screen topic for instructions on adding a council member. |
| 4. | If a staff member is not included in the drop-down, click the Add Staff Member link. |
| a. | Enter search text in at least one field. |
| b. | Click the Search button. A list of matching people is displayed. |
| c. | Select the checkbox for the appropriate person and click the Add Selected Member button. The staff member is added to the drop-down. |
Viewing existing conflicts
Once a member is selected from the drop-down, any existing conflicts are displayed in the Existing Conflicts pane.

If an  Expand button is displayed for a conflict, click it to view a list of applications affected by the conflict.

NOTE: When a conflict is added to an application for a council member, a conflict is automatically added to all applications for that FOA.
Adding Conflicts
| 1. | Use the instructions in the Selecting a staff or council member to select the member for whom you wish to add a conflict. |
| 2. | Click the Add Conflicts header to expand the pane. |

Conflict Search is used to create conflicts between members and organizations or people for the purpose of managing member conflicts. This can be done in two ways: searching for organizations and associating members, or searching for people and associating members.
Searching for Organizations
By default, the Conflict Search screen is displayed with the Organization Search tab active.

| 3. | Begin typing search text in the Organization Name field. Possible matches are displayed in a drop-down. |
| 4. | Select a matching organization name. |
| 5. | Click the Search button. A list of matching organizations is displayed. |
| 6. | Select the checkbox for the appropriate organization and click the Add Conflicts button. The conflict is added for the selected member. |
NOTE: When a council member has a conflict with one application, a conflict is automatically added to all applications for that FOA.
Searching for People
| 1. | Click the Person Search tab. |

| 2. | Enter search text in at least one field. |
| 3. | Click the Search button. A list of matching people is displayed. |
| 4. | Select the checkbox for the appropriate person and click the Add Conflicts button. The conflict is added for the selected member. |
NOTE: When a council member has a conflict with one application, a conflict is automatically added to all applications for that FOA.
Adding a conflict expiration date
You can add expiration dates to existing conflicts where applicable.
| 1. | Click the  Edit button in the Expiration Date column. The Edit Expiration date screen is displayed. Edit button in the Expiration Date column. The Edit Expiration date screen is displayed. |
| 2. | Click the |
| 3. | Click the Save button. The expiration date is added to the conflict. |
Adding conflict notes
You can add notes to existing conflicts where applicable.
| 1. | Click the  Edit button in the Notes column. The Edit Notes screen is displayed. Edit button in the Notes column. The Edit Notes screen is displayed. |
| 2. | Click the Save button. The expiration date is added to the conflict. |
NOTE: The same process can be used to add additional information to existing notes.
Deleting a conflict
| 1. | To delete an existing conflict, click the Delete button. A confirmation screen is displayed. |
| 2. | Click the Confirm button. The conflict is deleted. |
