Validating the Application
IMPORTANT: This topic is applicable only to multi-project applications.
Before an application can be submitted, it must pass various system and business validations at both the overall application and individual component levels. Validation checks are triggered automatically whenever the status of the application or component is updated by an ASSIST user; however, validation checks can also be run manually if chosen. ASSIST users can choose to validate the entire application or individual components as desired. To validate the entire application, a user must have the Entire Application Editor - All (both Budget and Non-Budget) Access level. To validate a component, a user must have the Editor - All (both Budget and Non-Budget) Access level for that component. Refer to the help topic titled Manage Access
Validating the Entire Application
To perform validations on the entire application:
- Select the Return to Application Info button on the Actions panel to return to the Application Information page.
- Navigate to the Application Information page.
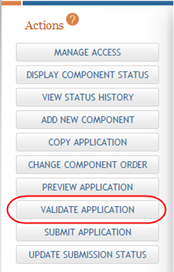
 Select the Validate Application button under Actions.
The system begins validating the application. If there are errors or warnings, they are listed on the Application Errors and Warnings Results page, which opens as a separate window. Errors must be corrected before the application can be submitted.
With no errors or warnings, a message displays as follows: No errors or warnings were found.
NOTE: ASSIST does not perform validations on components in Abandoned status.
Refer to the help topic titled Application Errors and Warnings Results for information on displayed errors and warnings.
Validating an Individual Component
To perform validations on an individual component:
- Navigate to the appropriate component by expanding it and selecting it from the Component Type section of the left-side navigation panel.
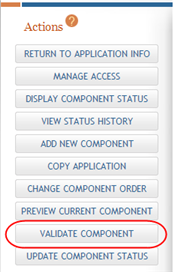
- Select the Validate Component button under Actions.
The system begins to validate the Component. If there are errors or warnings, they are listed on the Application Errors and Warnings Results page, which opens as a separate window.
ASSIST cannot perform all validation checks on the application if required components or required forms are missing. When this occurs, error messages to this effect display on the Application Errors and Warnings Results page.
If no errors exist and no warnings are necessary, a message displays as follows: No errors or warnings were found.
IMPORTANT: If you experience difficulties with the Validation function, it may be due to your browser having a pop-up blocker enabled. To correct this, please ensure you include an exception into your browser's security settings, listing the URL as: *.nih* to allow popups from the NIH.
